Honda Rebel 250 & 450 Forum banner

FAQ: Valve Adjustment

141K views 237 replies 72 participants last post by  SoakedKarma  
#1 · (Edited by Moderator)
10/05/2018 This post has been edited to show the simple procedure below, first described by Duckster.

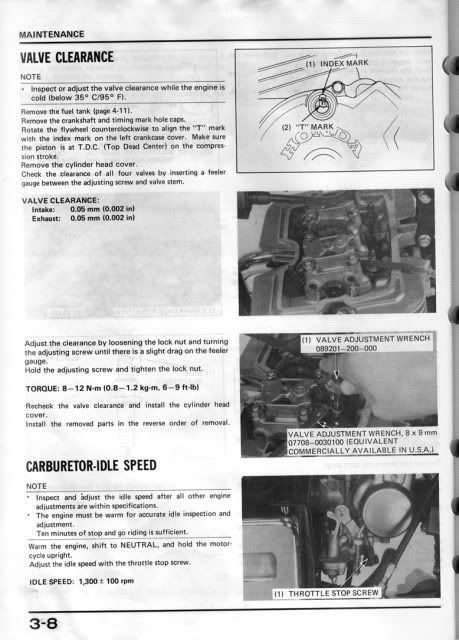
Remove the two front tank bolts and place a 2”X4” under it to allow clearance for removing the valve cover. Pull the spark plugs so the engine will turn over easily, and put the bike in 5th gear so you can use the rear wheel to roll the engine over. Raise the rear wheel (swingarm lift, blocks under the frame, etc.). Now you can check valve clearances quickly without being concerned about the timing marks on the crankshaft by taking advantage of the Rebel's overhead camshaft and 360 degree crankshaft arrangement.

If you don't have a stand, it isn’t essential; you can still roll the bike back and forth as needed to rotate the engine. Just pull in the clutch to roll the bike backward without turning the engine. Always roll the bike forward to turn over the engine.

Once you have the valve cover off, roll the engine over until the left exhaust valve starts to open (rocker arm goes down). Then roll it very slowly until the rocker arm is all the way down. Don't worry if it starts back up again, that's good enough.
At this point the left exhaust valve is fully open. Now check the clearance on the right exhaust valve. It is in the middle of the cam "base circle" and your clearance check and adjustment if needed will be correct.

Repeat the procedure for the left exhaust valve, and then do the intakes in exactly the same way.
 
#2 ·
I haven't done one of these yet. I don't know of any web sites. Best bet would be to buy a Honda service manual. The manual issued for 1996 covers years up to '99. The manuals issued in 2000 cover the 1996-2008 years for sure and maybe the 2009 year. If you get a Clymers you might be disappointed, so just save yourself the hassle.
 
#4 · (Edited by Moderator)
Tool list:
  • 8mm wrench (seat)
  • 9mm wrench (valve lock nut)
  • 12mm wrench (valve cover)
  • 5/8" Spark plug socket
  • Large flat-head screwdriver (crankcase access covers)
  • Needle-nose pliers (valve screws)
  • 14mm socket and ratchet (turning crank to TDC)
  • Feeler gauges (0.076mm or .003")
Proceedure:

  • Disconnect negative battery lead (for safety)
  • Remove seat.
  • Turn off petcock, remove fuel line at carborator.
  • Remove fuel tank.
  • Remove Spark plugs.
  • Remove valve cover, two 12mm bolts on top.
  • remove timing cover and crank access cover on left crankcase cover (img 1). (Be careful, these can be wallowed out easily. Use a large screwdriver, large washer or other tool to remove these.)
[NOTE: for reference we will assume cylinder #1 is the left cylinder (as you are facing front from riding position). Cylinder #2 is the right cylinder.]

  • With 15mm ratchet turn crank COUNTERCLOCKWISE until you see the "T" on the flywheel through the timeing inspection hole (img 1).
Image
[img 1]
  • Note the direction of the notch on the end of the camshaft (img 2). If it is pointing towards the rear of the bike, then you are going to be working on cylinder #1, if it is pointing towards the front, you will be working on cylinder #2. The rocker is the dark piece of metal with a nut and a screw going through it (img 3). Grab one of the rockers on the cylinder you are workng on and give it a slight tug up and down, it should move slightly.
Image

[img 2]


Valve Adjustment:
  • Loosen the nut on top of the rocker arm, and loosen the screw enough to insert your feeler gauge.
  • Insert .076mm (.003") feeler guage between the screw and the top of the valve (img 3)
Image

[img 3]
  • Tighten the screw until the feeler gauge has resistance when you pull it. It should not move freely, but rather have some "drag" on it. With the feeler gauge still inserted, tighten the lock nut by holding the screw with needlenose pliers and turning the nut tight with a 10mm wrench. Check the clearance again when you remove the feeler gauge, it should drag. Re-adjust as necessary.
Repeat the valve adjustment for the other cylinder by rotating the crankshaft counterclockwise 360 degrees and line up the "T" at the top again.

  • Replace valve cover. NOTE: be sure that the gasket is smooth in the groove with no pinches, cuts or breaks.
  • Tighten the valve cover bolts to 7ft-lbs.
  • Replace fuel tank.
  • replace fuel line.
  • turn on petcock.
  • Replace seat
  • Re-connect battery.
[credit for images to Tom O.]
 
#7 ·
Okay, I'm about to do this again. I did it once about 500 miles after the Dealer did my "warranty" adjustment, and again just a couple hundred miles ago. I used Clymer's instructions both times. The first time was slow because it was my first time, but everything went the way the book said it would. The second time, I couldn't get a gap on any of the valves, so I put the two I had loosened as close as I could get them to match the other two. It runs and sounds good, but I'm really afraid of burning my valves. I have everything open, including a cold beer. I'm going in!
 
#8 ·
I just adjusted again, based on Cagie's concise instructions, and Tom O.'s fine pix. Everything went just as smooth as could be. Three of my valves needed to be loosened up just a hair. I will sleep much better tonight. It took me longer to get the last pillion seat screw into place than it did to do the adjustment.:p
 
#9 ·
Valve adjustment ...

These instructions are fantastic!
Some quick questions:

1) Can someone provide a list of tools needed? (I saw this somwhere but can't find it.)

2) Is this basically all the dealer does at the infamous 600 mile "check-up" (apart from checking the chain tension)?

3) If the answer to 2) is "yes", is the warranty still in effect if I skip the dealer and do it myself?

4) Will this thread remain online permanently so I can do this, say, next spring? (I'm assuming the answer is "yes", but just checking).

Again, thanks to all the wise heads popping up around here!
 
#10 ·
Tool list added to original post.

The instruction will probably be moved to the "How to and Tech Tips" if there is enough interest to keep it.
 
#13 ·
Trust me when I say do not put a lot of torque on the valve cover bolts. Don't even think about using an air ratchet. My little 20 year old taiwan 1/4" drive air ratchet snapped one right off. They break off flush with the cam carrier where they screw in. Not hard to fix, but when you have broken something on your new bike you feel really bad.
 
#16 · (Edited)
I have seen a lot of posts about valve adjustment on various web sites but this is the best. http://www.*************/rebelforum/viewtopic.php?t=21622&highlight=zep - go there - download the video and save it for future reference.

Now - ZEP is a great guy and very good at describing how to but some of you are REAL new to mechanics.

If you are using metric feeler gages the clearance is .05 mm to .10 mm. Honda calls for .002 in. to 004 in.

Adjusting the valve clearance requires a "feel" for the "drag" on a feeler gage. If you have never done this before - - - close your mouth, don't clamp your jaws, just close your mouth, now take your feeler gage or a piece of common typewriter paper (the feeler gage is less likely to cut your lips) - place it against your closed lips and draw it through your lips. This is the approximate "drag" that you should feel on a properly adjusted valve gap.

DO NOT try to adjust your valves to the minimum gap (o.002 in) The minimum gap means that any wear or extra heat on the head can reduce your valve tappet clearance to the point that you could burn your valve seats - and that means a new head!

It is very important that your bike cool down, out of direct sunlight for at least 24 hours before you try to adjust the valve tappet clearance. If you cannot possibly let your bike set that long try adjusting your valve clearance to .003 in to .005 in to allow for the effects of residual heat in the metal parts.
 
#31 ·
DO NOT try to adjust your valves to the minimum gap (o.002 in) The minimum gap means that any wear or extra heat on the head can reduce your valve tappet clearance to the point that you could burn your valve seats - and that means a new head!
I don't agree with this statement.

The manual gives a specification of 0.05mm. It doesn't give a +- tollerance, just the spec. When your engine warms up, the gap between the top of the valve stem and the tappet adjuster doesn't get smaller, it gets larger. I just adjusted my valves today and confirmed it. The engine cooled overnight and this am was the head was 68 degrees F. I adjusted to 0.05mm with slight drag. (I will say that whoever did the valves at the 600 mile check up either didn't do it or didn't do it right. I could easily get a .15mm feeler gauge in all the gaps.) Anyway, I put it back together enough to run the bike with an external tank attached and ran it for about 10 minutes. The heads were now reading about 195 degrees F. I turned it off, removed the valve cover and checked the clearances again. I could easily get a .07mm gauge in the gap. Aluminum heads expand more than the steel valve does, which effectively pulls the valve further away from the tappet. If you don't believe this, check for yourself. I think that the real important thing to do is make sure the engine has completely cooled before making your adjustments.
 
#20 ·
Thanks for getting a link on the video up on the site. As a little add on, ZEP says that his mpg and top speed have both improved a little when he got all four valves properly gapped at .004 in and he has not noticed any increased tappet noise.

Since the 600 mile and 4000 mile service from a dealer can cost over $200 and this is the hardest part of the service, learning these techniques can save you a bundle. You might notice in the video that ZEP is using a low cost, spring blade torque wrench, I use a 3/8" drive "clicker" torque wrench that I picked up at Harbor Freight for less than $20, a 1/2" drive clicker wrench is also available for about $20. I have both.

In fact I just discovered that I have TWO 1/2" drive wrenches. If anyone wants one in a case for $20 plus shipping pm me and I'll give you the shipping cost to your address and you can pay my paypal account. :p

:cool: Don't forget to download and watch the video.
 
#22 ·
Ok I've done about a zillion valve adjustments on over a hundred different bikes (not al of them mine), screw and locknut, shim over bucket, shim under bucket, even Ducati. The Rebel has the easiest type, screw and locknut. and it only has 4 valves total.

You dont need to line up any marks on the flywheel, to me that just causes confusion. All you have to do is make sure the valve you are adjusting is closed. With the cover off, turn the engine over with a socket, and you can watch the rocker arms go up and down. When they are up, on the screw and locknut end, the valve is closed. It will remain closed for several degrees of crankshaft revolution, then start to open again. Remember, check and adjust while it is closed. You should be able to feel a slight looseness in the rocker arm.

Do not try to get the valves as tight as possible, adjust them to the loose end of spec. And make sure you recheck the clearance after tightening the locknut. Sometimes it will change just a little. Jerry.
 
#28 ·
My scooter has an "eccentric" valve adjustment, with graduated lines drawn right on it. Simpliest ever! You just put the pistion on TDC........then loosen a little bolt on the eccentric, then rotate until there is no valve clearance, then move till the little pointer is two spaces over. tighten bolt and done! Only two valves too.


Cookie
 
#26 ·
This is perfect! I am about to open my bike for the Rings to be replaced and the Valves need adjusting because there is a knocking/ticking noise that is Horrid!
My bike is a 1982 CM250C and he is in ok condition. I was wondering if any one had the manual that can be scanned and send me the info on the work for the rings?
I sure would like to bye one, but the rings were stretching my fixed income as it is. So if anyone wants to lend a helping hand, I would give Many thanks!
 
#29 ·
IMO, the guy in the video is doing it wrong. He is using a socket to tighten the locknuts. This will not work well, as is obvious from the video. You need to use a box end wrench on the locknuts, and another, very small wrench on the square head of the adjuster itself. That's why the head is square. You can buy wrenches that are designed to fit these, you can make one, or you can use a really small crescent wrench ( I have one about 3" long). That way, you can hold the adjuster in place while you tighten the locknut, drastically reducing the chance the adjustment will change when you tighten it. I have never used a torque wrench on valves. Just snug them up. They break easy, so don't overtighten them. Once you get a feel for tightening the locknuts, just like for the proper drag on a feeler gauge, you will not need a torque wrench. Jerry.
 
#37 ·
What I would do is hold my wrench on the bolt, and then put a foot long length of pipe on the end of it and slide it all the way to the edge of the bolt. And then I would take a seven pound weight (Variable weight dumbells of course, or I could only do one torque rating. This situation would call for a 2.5 pound handle and 4.5 pounds of weights. That I would achieve by adding two each of two pounds and quarter pounds.) and attach it to the hole I drilled in the end of the pipe using wire. Naturally, this would only work if the wrench was being pulled in the direction I want the force to go, so my bike would be on it's side, making the valve cover bolts orthagonal to the ground. Alternatively, I could use a pulley system to change the direction of translation to be transferred to rotational motion so I could leave my bike standing up. Also, if you don't have the required weights, you can always use a block and tackle.

Just an idea.