Honda Rebel 250 & 450 Forum banner

Honda Rebel 250 Carburetor Diagram

79K views 31 replies 11 participants last post by  flitecontrol  
#1 ·
Image
 
  • Like
Reactions: Adrellwynd
#3 · (Edited)
Several issues ON WIFES 2006 REBEL
pipes very blue top 6"
could the valves have been improperly set at setup time? One cylinder seems to be missing some. Have switched coils etc
i finally have it running half-way decent, but i have to have the choke 1/2 way on.
IS THIS A CHOKE OR CALLED SOMETHING ELSE?
IS IT ON AT TOP, BY THE FLAP MARK OR IS IT ON AT THE PLAIN END OF THE MARK.
I HAVE NOT REMOVED CARB FOR CLEANING, BUT HAVE USED BUSTER AND COMPRESSED AIR TO BLOW ALL THE ORIFICES WHICH SEEMS TO HAVE RESOLVED THE ISSUE OF GUMBED UP CARB.
THANKS BOB (BOB2506)
 
#4 ·
The only way to know if your valves need to be adjusted, is to remove the valve cover and check them with a feeler gauge. Do a search on this site for "valve adjustment", and if you don't have one, I would strongly recommend a repair manual before you start.
As for the carb, if you have to use the choke to make it run after it's started, then your carb is not clean. You're gonna have to remove it from the bike and completely disassemble for a thorough soaking 24 to 48 hours in a good carb cleaning chemical following directions on the can, and then use compressed air to blow out all small orifices.
 
#5 ·
Hey guys and gals! I am new to this site. I am looking for advice on a fuel leak from the carburetor on a 2002, 250cc.

I am trying to determine the source of the leak before I take it off and repair it. According to the diagram above it looks like it is leaking from item # 47. The clip can easily be spun from side to side but not in a complete circle as it contacts the carb body. What does it do anyways? Is leakage from here common? Any suggestions on repairs?

As soon as I figure out how to attach pictures I will

Todd
 
#6 ·
Welcome. #47 is part of the throttle linkage, and has no direct connection to fuel. Did you possibly mean part #37? Check again and see if you can narrow down where the leak is coming from.
 
#17 ·
Image

Hope it’s ok to drop this question here: I cleaned my carb (2014 cmx250c) and fuel is pouring straight from inlet tube through the hole pictured here. (Totally bypassing the needle valve) The hole I’m addressing is the one down inside the recessed area to the right of the jets. (Approx center of photo). Any idea what I am missing?
 
#7 ·
Thanks for the welcome.

It is definitely not leaking from the drain hose. I pulled both the top and bottom hoses off to see if anything was flowing out of them and nothing. The whole body of the carb will get wet with fuel even above the float bowl. Although I admit this may be from wind while driving.

If someone could point me in the right direction for posting pictures I could point out to where I think it's leaking.

Todd
 
#9 ·
The pilot screw, also called the air/fuel screw, is number 22 above. Number 18 in the above diagram is the idle adjustment screw, which has ho connection to fuel. If the O-ring on the pilot screw has failed, that could cause a leak, as could a faulty bowl gasket, which isn't shown in the diagram above, but is part number 25 here: 2009 Honda CMX250C A CARBURETOR | Cheap Cycle Parts

To post pictures, in the Reply box, look in the tool bar at the top and click on the square with the mountains in it.
 
#11 ·
@haf Accelerator pump seal is an integral part of diaphragm outer edge..
might try torquing the three screws,, diaphragm replacement is indicated..

Honda part #16021-KBG-670 and 16021-KEN-620 are both listed..
Linked pages also shows Related Fitment bikes that may have better parts availability in Greece..
 
#12 ·
whatever you do, DO NOT use Red High-temp RTV gasket sealer.:nonono:
That stuff might be oil and heat resistant but gasoline dissolves it into a carb clogging mess. I know because I made this mistake.
 
#13 ·
I've got a bit of a carb rebuild mystery, and some of the info here is helpful but some is still confusing.

The bike's a 2009 CMX250C and I've given the carb a good cleaning and reassembled it with a rebuild kit. I expect an extra part or two (there are two large bowl gaskets and I only need one). The kit came with a new slow jet and a new needle jet set (along with other bits) but not a new needle jet holder. It DOES, however, include a new main jet and that is what is puzzling me.

The parts diagrams I've found resemble the ones linked to by flitecontrol and posted by haf. I have both needle jet parts labeled as part 2, and I've reinstalled the tube part into the hole below the needle jet holder (part 25). The main jet is labeled as part 35 in both of those diagrams (and in the manual I have). My problem is that it can't go where it's supposed to go! The top of my needle jet holder is slotted so I can install it with a screwdriver or wrench. It does not have threads for the main jet and the opening isn't even big enough for the main jet to fit into.

Interestingly, my carb somewhat resembles the original diagram posted at the top of this thread (which I've never seen before). It shows the needle jet holder as part 24, and there is no main jet to screw into it. That looks like my carb. However, the needle jet itself is only one part (part 10) with no tube below it. That does not look like my carb.

Is my main jet supposed to be installed somehow? Do I need a different needle jet holder in order to do that? I don't know that the parts I have are original but they seem OK and the bike started and ran when I reinstalled everything. It was only after I did that that I noticed the missing main jet in the diagrams so I took the whole thing apart again. Here are pics showing these parts before and after installation. Thanks very much for the help!
 

Attachments

#14 ·
This thread and the pictures with it may help. https://www.hondarebelforum.com/f76/rich-mixture-121103.html

The needle jet is installed under the main jet tube holder with the concave end facing the needle. The engine won't run well if it is reversed. Don't ask how I know this. Unless your needle and needle jet are damaged, I recommend using the originals. Kit replacements can differ from OEM in diameter and length, which can cause issues.

The main jet is the slotted thing you see at the top of the tube holder. You have to unscrew the old one to get the new one in. Be careful not to damage the tube holder when removing the main jet. Install the tube and then the main jet.
 
#15 · (Edited)
Oh, man, do I feel dumb! Thanks, flitecontrol, for the quick reply. My first reaction was to think, "yeah, I know that but there's no place to put it". But I had been looking around and finally found a photo of the part here on Partzilla: https://www.partzilla.com/product/honda/16165-KBG-770

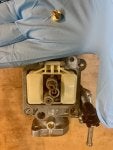
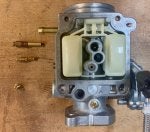
I measured mine and found it was 1/8" longer. Then I realized that it also had a longer section beyond the left edge of the part in the photo. My main jet was there all along, screwed in place!!! The angle's a little off in the second photo above, but the light oxidation on the part made the two of them look absolutely like one seamless piece. I guess I should have wondered why they put flats for a wrench and a slot for a screwdriver on the same part.

A tight grip with a wrench and a solid twist of a good-fitting screwdriver, and poof - two parts! I'll be shaking my head over that for a long time.....

The original part I just discovered/removed is labeled with a little symbol and "108". The new part has no markings. It appears that the hole in the new part is slightly larger, but the old one might be narrowed from corrosion, etc. Does swapping the "108" for something a little larger sound like a good idea? I definitely belong to the "it always needs a little choke or it will stall" club, so running a little richer is appealing.
 
#16 ·
That number is the size of the (main) jet. I would think that the replacement would also be marked, so you'd know what you have. The fact that it doesn't concerns me. I didn't mention it in my first post, but I really don't see the need for replacement jets unless the OEM jets are somehow damaged. A larger pilot jet would produce a somewhat richer idle. A bigger main jet shouldn't affect idle at all.

I've had two Rebels that only needed choke in very cold weather. The current ride needs it for every start, no matter the temperature. If your bike needs choke after the engine has warmed up, that's a sign of a dirty carb. Since you've cleaned yours, that shouldn't be an issue now.
 
#18 · (Edited)
By needle valve, do you mean the float valve? The brass float valve seat is at the upper left of your picture, partially shown. I got one of my carbs out and blew through the inlet tube. With a finger over the float valve seat, there is no air flow past the valve seat, so I'm confused as to how fuel is getting to that hole, unless your carb is somehow different or damaged.

Your picture shows the carb upside down. When right-side-up, it would seem gravity would prevent fuel from flowing uphill.
 
#20 ·
Yes I meant float valve. Yes carb is upside down so you can see the hole I am trying to illustrate.
Hmm I must have damaged it then. Ugh. So sad there are no Chinese knock off wing carbs available at a decent (cheap) proce. U can get the doubles for $50-$70 but singles are $300. I really don’t get that. But yes fule
Comes straight out of that hole.
Maybe it’s a hole from production of the carb as it seems to serve no other purpose. Maybe I knock through the blockage if (I don’t recall but quite possible) clearing the fuel inlet line.
Dang. Thanks. Just thought maybe I was missing something.
 
#23 ·
If you can blow through the fuel inlet and it comes out the float valve seat, there is no blockage. As SoakedKarma stated earlier, that hole is just a vent, and does serve a purpose. If you connected the fuel line to the upper tube, that would cause fuel to come out of that hole. The correct location to attach the fuel line is the lower tube.
 
#24 ·
Yes u guys hit the nail on the head! I had fuel line connected to wrong port. Works and runs great now. Just 2 las issues- I have a vent/ drain tube “T” without a connection. Coming off that same one is this long tube. I convince myself when diving in-“no need to label this stuff you will remember where it goes”. Wish I’d not do that! Any ideas where the line goes and where the empty port on the t belongs?
lots of hose on that line. And the tank is already vented. I shouldn’t connect the t and line together as that would simply form a loop onto itself.
 
#28 ·