Honda Rebel 250 & 450 Forum banner

LED Turn Signal, Brake/Tail &running light conversion

92K views 227 replies 49 participants last post by  lhatl250  
#1 · (Edited)
In my quest for saving electrical power for running some of my favorite goodies, I decided to do an LED conversion.
I had changed my front signals in '88 to three wire turn/running lights so I
purchased two amber 1157 LED and two amber 1156 LED bulbs as well as a red 1157 LED for the tail/brake.

Converting the brake/tail was a simple plug and ply operation.
The signals was another issue. I changed out the flasher for an electronic one. Car Quest had one on the shelf. Simple plug and pay there.
Putting the rear 1156 in was also straight forward. Had I left the incandescent bulbs up front, I could have called it good right there. Putting the 1157 LED bulbs up front, I had the notorious four light flash. I had though about doing a two indicator system but decided to try an LED indicator bulb. A quick run up to Auto Zone for a pack of 194 LED bulbs solved the cross connection issue.
Image


If I had the OE front signals it would have been finished but the 1157 LED bulbs threw me yet another curve. With the running lights the signals did not want to flash. They would modulate but not fully flash.
When I disconnected the wires for the front running lights there was no improvement. I noticed that if I grounded the running light wires from the front signals the signals would flash correctly.
That's all well and good but I like my front running lights.
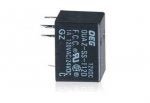
After studying the schematic for the Rebel I decide to install a relay so I could have my running lights. I chose under the seat for the relay.
Radio Shack micro relay part number 275-241 looked to be a good choice. Tiny and robust it would tuck easily in to the area above the airbox under the seat. Soldering on the connections isn't for the faint of heart but the compact relay was worth the effort.
Image


Putting a nice shrink wrap conduit with the two running light wires in it, the run along the main harness was very easy. I tapped in to the tail light circuit at the fender harness connection and also tapped in to both signals.
Powering the relay meant using the taps from both sides of the turn signal.
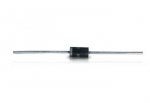
To prevent back feed and end up with the four flashing signal problem again, a pair of diodes for the relay power made for a quick and easy fix. I used 3 amp rectifier diodes from Radio Shack part number 276-1141 . They come two in a pack and two is what I needed.
Image

When the signals are on, the relay connects the two running light wires to ground. The signals and indicator function just as they should.
When the signal is canceled, the relay switches back to the lower output front running lights powered by the tail light wire.


Since the 194 LED bulbs came in a two pack, I replaced the neutral indicator with the second one from from the pack.
The only downside with that is the amber 194 LED bulb in the neutral indicator is the amber shows through the green lens.
Still, that's livable.
The relay has a slight capacitance in its energizing coil, just enough so that it will stay latched during operation as long as the battery voltage and charging system voltage are at good.
One side effect of the relay is if battery voltage drops, the relay starts to click with the flasher blinking the opposite side running light.
I just figure I'll use that to judge my power draw when using heated gear! :D
 

Attachments

#29 ·
I installed led signals all the way around, so I'm having this problem would u explain how to hook up the three wire flasher, I think that's the best route for me. Also I'm assuming I don't need the relay because I only have turn signals not running lights???
 
#30 ·
You won't need the relays, no.

Get an electronic or electromechanical flasher that uses the standard three wire hook up. It should be rated for LED use.
You should have your seat off to get to the flasher. You will want to take off the tank as well. You may want to remove the headlight but either way, you need to access the black junction box on the front just behind the headlight.
Your OE flasher will have two wires with blade connectors. There will be a black wire and a gray wire. You should see the three terminals on the new flasher marked by embossed letters. They should be marked X, L, and P.
Put the black wire on the terminal marked X. Put the gray wire on terminal L.
Now, get a good length of 16 gauge wire, a female blade connector, a female 3.8 mm female bullet connector and a crimping tool if you don't have one.
On the flasher end, crimp on the new blade connector. Extra points for soldering it on as well. Run some shrink tube down the wire and cover the crimp/solder joint. Heat to shrink. Plug that connector on to the P terminal. Run the wire up along the frame using the loops and looms that are already there for the harness. The wire needs to end up in the front junction box.
If you have a first gen Rebel its easy from here. If you have a second gen, it is a bit more complex but still not bad.
First generation: trace the wires coming out of your dash indicator There will be a light blue one an orange one going in to a four gang female bullet connection with all the same color wires. Unplug the dash indicator wires, leaving the others plugged in.
Put some shrink tube down the wire you just ran up from the flasher and crimp/solder on the 3.8mm female bullet connector. Plug one of the dash lit wires in. It really doesn't matter if you use the orange or the light blue, just plug on in.
The other dash light wire you didn't use needs to be plugged in to a four gang female bullet connector that has all dark green wires in it. Dark Green is ground on the Honda.

On a second generation Rebel the dash light runs in a harness connected by a multi-plug. The dash indicator wires are black with orange trace and black with white trace. Here you will need a couple more connectors. Cut the wire from the dash light above (dash side) the plug. Put a male 3.8mm bullet connector on one. Agian, it doesn't really matter which. Plug that in to your new wire. The other need to be grounded. You can either splice in to the ground on the harness or run a bullet connector on it and plug in to a dark green four gang with an open spot.
The ground for the dash harness is black with a green trace.
Test you setup. It should work if all the wires are connected. Once you know it works, button it all back up.
OK, good luck and have fun.

You see, the three wire flasher works by alternating connections while flashing, X ix 12V in. L is for load. It should have the signals on that side. P is for pilot as in pilot or dash light. When in operation the three wire flash back and for going from power to l then power to P. As your signals are on, the dash light is off and whe the sinals are off the dash light is on. Flashing L-P-L-P-L-Pand so on.
Now, this knowledge is very dangerous. One could hook red or, God forbid, blue lights up on the terminals of that flasher. It would look like the alternating lights of a school bus or emergency vehicle. DO NOT do this however. Impersonation a peace officer is a very serious offense and will get you in a metric boatload of trouble.
 
  • Like
Reactions: red_delicious
#39 ·
On a second generation Rebel the dash light runs in a harness connected by a multi-plug.

The dash indicator wires are black with orange trace and black with white trace.
I take it I should cut both of these wires. One goes into the new wire and the other gets grounded by being plugged into the four gang connector with an open slot

Here you will need a couple more connectors. Cut the wire from the dash light above (dash side) the plug.

Put a male 3.8mm bullet connector on one. Agian, it doesn't really matter which.

Plug that in to your new wire.

The other need to be grounded. You can either splice in to the ground on the harness or run a bullet connector on it and plug in to a dark green four gang with an open spot.

The ground for the dash harness is black with a green trace.
if so cool, i can do this. :)

got the supplies today. the bulbs and flasher came in then i ran out to the hardware store to get some connectors and wire.
 
#31 ·
Hi buick and thanks for your patience and assistance. I realize that you must bet tire of answering question on this subject and I appreciate the help.

I am looking to keep it operating as stock as possible.

I am putting together a parts list for upgrading my 2nd gen bike to a LED system. From what I understand I need 5 led bulbs preferably “Suprbright R-45T 1157” from superbrightleds.com. For best results 4 should be amber coupled with 4 K & S Turn Signal Lens 251070C clear. The 5th should be clear, which is used in the tail/brake light. Is there anything I need to know about the fifth considering that it is always on and brightens when engaged? Such as the consideration with the head light.

The last part is a three prong electronic flasher unit from an auto parts store. When I go to the part store I assume I ask for one that works with LEDs or should I ask for something else.

The list consists of
4 clear lens “K & S Turn Signal Lens 251070C”
4 bulbs amber “Suprbright R-45T 1157”
1 bulb clear “Suprbright R-45T 1157”
1 3 prong LED rated electronic flasher unit.

I realize that it is a stupid question but I suck at electrical work and want to avoid dopey mistakes.
 
#32 · (Edited)
I seldom if ever tire of talking Rebel electrics. No problem at all!
There are a few things on your list that can and one that should be changed.
Remember, there are no stupid questions asked. Only the ones not asked are problems.

The last part is a three prong electronic flasher unit from an auto parts store. When I go to the part store I assume I ask for one that works with LEDs or should I ask for something else.

The list consists of
4 clear lens “K & S Turn Signal Lens 251070C”
4 bulbs amber “Suprbright R-45T 1157”
1 bulb clear “Suprbright R-45T 1157”
1 3 prong LED rated electronic flasher unit.
You don't need clear lenses to run the LED lights. The only time it becomes necessary is when running red rear signals. If you are staying with amber signals only, you can keep the amber lenses and the color will be vivid and bright. you can run clear for the look, but you don't need them. The LED part from SuperBrightLED will be 1156 A-45T. You need the 1156 if you are running the single contact (OE) signal sockets
Which brings us to the tail light. There you want a red LED bulb. The part number is the right one. 1157 R-45T is red. The 1157 W-45T would be the cool white but it will wash out behind your red tail/brake light lens. The red will be very bright and vivid.

While you are getting LEDs, throw in the plate light. That would be the 67-W15. Its a coolwhite bulb that will fit in the plate light area while saving you another 7 watts or so.
You can go three wire flasher or run diodes with a two prong flasher. Usually you can askbut a lot of counter guys aren't all that skilled and get confused with custom applications. You, of course, could get either flasher from SuperBright and know it will work for you.

So, your revised list should read:

  • 4 each Amber 1156 A-45T bulbs
  • 1 each Red 1157 R-45T
  • 1 each 67 W15
  • 1 electronic flasher.

Two or three prong is up to how you want to wire it. Your choice between three prong and running another wire up to the junction or making a diode pack to stuff in the front junction. Either will work.
Clear lenses for your application are entirely optional and for aesthitic purposes.
 
#34 ·
No problem Jerry.
If you ever want to go front running lights, a simple diode/resistor pack can be added in your front junction to give you running lights and retain signal function. Since its in the front, you can still keep the amber lenses and not have to replace the expensive Amber LED bulbs and sockets for 1157 bulb. Total cost of that modification should be about $10. The hard part is stuffing everything back in the front junction. :D
 
#35 ·
#37 · (Edited)
Ezrida2610, it will be the straight forward bullet connector then . There shouldn't be too much of a room issue.

Jerry, The FL2-red for the two prong or the FL3-red for the three wire will plug in. I know they say they are for American cars but that's the type the Rebel uses.
 
#40 ·
Yep, that's about it. You could even splice the ground on the dash connector if you feel comfortable enough with wiring to do that.

Where did you find 3.8 mm bullet connectors? The only place I could get them is sending away to Electrical Connectors
 
#41 · (Edited)
#43 ·
unfortunately i don't have power out in my garage so i can't run a soldering iron. although i'm thinking of getting one of those butane ones.
I have a few of those, the radio shack one they sell these days is pretty decent. I use it all the time and have only have to refill it a couple times in the three years. nice thing about them is the ability to control your tip temperature.

Keep one on the bike for emergency repairs or to light a campfire with the torch tip :whistling:
 
#42 ·
I've never read that book but it should be good. The Rebel has such basic wiring, its good to learn on.
 
#44 ·
Thanks Buickguy works like a charm!!!!!! I have another question: I rode it for the 1st yesterday on the streets and I shifted like u would any manual trans vehicle and seemed to top out at 45mph in 5th. Well from what I've been reading, after the fact, I should really ride the gears a lot longer before shift to get the speed I'm looking for and the high rev sound is normal???? Is this true? Please advise me, thank u.
 
#45 · (Edited)
Glad the LED worked out for you.

Yes, the Rebel can rev and loves it. If you look on the speedometer you will see the max shift points for each gear. You don't always have to wind it out but you can wind it up safely and the engine just zings along. You'll be surprised how peppy it feels when you wind it up.
 
#46 ·
Yeah, thanks man!!!! Went head and rode into work get morning, great ride and it does have a little pep a little cold though, with the wind blowing up my pant legs!!!!! I'm going tackle my fork seals next cause they're leaking pretty good, hopefully this weekend. Any advice or instructions would be greatly appreciated, I can't seem to find any clear, specific directions for the Rebel 250. Thanks again man.
 
#47 ·
When I changed mine I couldn't have done it without a vise to hold them while taking out the bottom bolts. They are extremely tight.
 
#52 ·
That is some nice stuff! Its good to have that resource, thank you!.
I have been getting my stuff from Electrical Connectors and its nice but that gives even more of a selection.
 
#53 · (Edited)
hey guys, i just got around to working on this project. i just wanted make sure i understand what you mean by 4 gang connectors in the front junction box.

i found two, the one with the dark green wires is full there is one with red wires. i have always been under the impression that red normally means it is hot.

buick you said "The other need to be grounded. You can either splice in to the ground on the harness or run a bullet connector on it and plug in to a dark green four gang with an open spot"

all week i've been practicing soldering wire and it has been coming out horrible, with that said i have been sweating pipes for years. so at the moment i am hesitant to do any soldering.

any ideas on how i should proceed?


Image


Image
 
#54 ·
A good crimp connection on a bullet terminal can be covered with heat shrink tubing for a professional finish. If you don't have enough open spots to hook into you can always add a male/female pigtail to a filled spot in order to create more available connections.
 
#56 · (Edited)
Yes, the pigtail style is what I did under the seat. There should be two ground gangs, at least there is on first gen Rebels.
The red wire on the first gen is unswitched hot from the main. It would be best to check it with a multimeter. Switched hot is black on the first gen.
 
#57 ·
i installed a three prong blinker unit under the seat and ran wire to the forward junction box. ok, i'll check the red set to see if it is hot. if it isn't i'll just plug into. i assume those plugs in the pics are the 4 gangs that you wrote about. there two of those in there one with green wires that has all four sockets full and the red one with an open socket.

thanks :)
 
#58 ·
Hey Buickguy,

When I got my 450 it didn't have signal lights. Instead of chasing down originals, I was thinking of putting on aftermarket LED's like these from Ebay.
Turn signal led Suzuki motorcycle super moto DR DRZ 350 450 400 650 SM dr200 200 | eBay

Motorcycle Integrated Turn Signals LED Side Mirrors BLK | eBay

Would I follow pretty much the same procedure you have outlined here for wiring? Since I wouldn't be using the bulbs you recommend, would there be any additional considerations? I haven't bought anything yet, so nothing is set in stone.

Thanks.